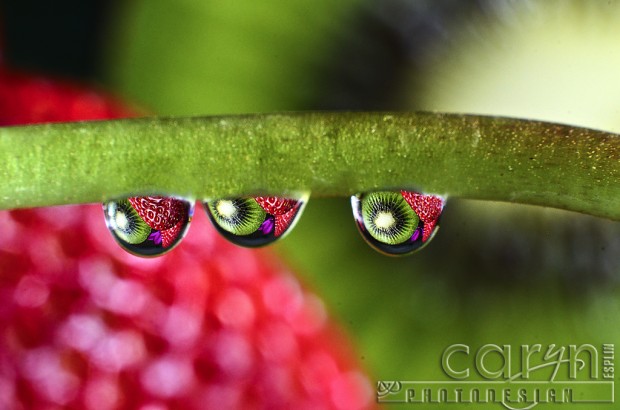
Macro + Water = My New Fascination – Follow this tutorial to get great results!
I am fascinated with shooting water – up close and personal! The reflections and colors are amazing because water does such an incredible job reflecting its environment. For example, notice how these water droplets act as mini fisheye lenses to magnify and project the kiwi and strawberry in the background. Shooting with a macro lens… or with the more affordable option – macro extension tubes — can open up a whole new world we don’t typically even notice. It is expensive to purchase a dedicated macro lens, so instead try macro tubes to convert your zoom lens to a macro lens!

Buy Yourself These Extension Tubes and Start the FUN!

For $55 – $60 you can purchase Macro Extension Tubes to convert your lens to Macro. I have tried the cheap ones for $12 and you cannot change the f/stop (aperture) so they are a waste of money. The $60 version works great and they seem to be just as good as the $160 version. The key is to buy the least expensive set that allows you to still set your aperture. This means you will get the metal pins to connect with your camera, so you can change the aperture. You will want to use manual focus, but if you don’t buy the auto focus model, you won’t be able to change the aperture. You can play with different combinations of the three different rings to get as close as you need.
I recommend using these tubes with a zoom lens, such as the 18-135, or 50-250mm or 70-200mm. It seems easiest to get a good focus with these tubes when you are zoomed to around 70 – 100mm. It is a little tricky to get a sharp focus with these tubes, so follow the steps in this tutorial:
TUTORIAL: How to use Macro Extension Tubes for great Macro images:
1. MANUAL FOCUS: Turn your lens to Manual focus. Look on the left side of your lens and change it to M.
2. PLENTY OF LIGHT: Use bright sunlight with high ISO, such as 800 because using tubes cut down your light. Also try using an LED or flash.
3. APERTURE: Use f/11 – f/16 is possible or you will get too much bokeh. Shooting with macro tubes will give you such a shallow depth that you need to compensate by using a large aperture number (small aperture opening) to increase depth of field.
4. CAMERA SETTINGS: Try this, but adjust as needed: ISO 800 – f/11 – 1/125. If your images are still turning out dark, add auxiliary light!
5. GET CLOSER: Find a small object between 1/4″ t0 1/2″ in size.
6. ZOOM OUT: Zoom your lens to about 85mm for starters.
7. FOCUS RING: Turn the focus ring on your lens to bring the object into focus.
8. MOVE IN & OUT: Move your body in closer and further from your subject until you see the object get sharp.
9. USE ALL THREE: Then fine tune the focus with a combination or turning your focus ring, turning your zoom ring and moving your position.
10. ADD WATER DROPS? Try spritzing your subject with water or use an eyedropper to add water drops for more interesting effects. Look for a horizontal stem to hang your drops on, then move the fruit or flowers in the background until you can see the reflection in the water drop!
After trying several different tube sets, here are my top recommendations for macro extension tubes:
Click Here for Amazon’s best deal on my top recommendation for Nikon Macro Extension Tubes for $60
Click Here for Amazon’s best deal on my top recommenation for Canon Macro Extension Tubes for $53


Hey, nice post on Kiwi. I never heard of that before. Thanks. Bye, Manu.
Thanks! How did you find my website / blog post?
Very nice picture and information 🙂 Thanks for your help…
This is EXACTLY what I am trying to accomplish. I have come close but not the tack sharp that I want and that is in your image. I am going to get the tubes and follow your steps to see what I can get! Thanks so much.