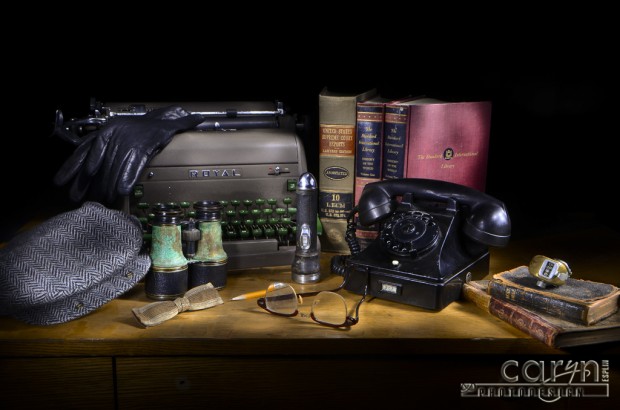
I absolutely LOVE light painting of all types, so if you want to give it a try, Table Top light painting is the perfect way to start out. First, you need to come up with a theme and gather some cool things. You can always borrow items from friends, family or neighbors. Most people will be flattered that you admire their things, and you can always offer to give them a print of the finished product. Scroll down to start the 10 Easy Steps!

One image, completely unedited: Old 1940s Desktop - Light Painting - Caryn Esplin - ISO: 320 - f/8.0 - 20 seconds
TUTORIAL: TABLE TOP LIGHT PAINTING IN 10 STEPS:
1. Find dark area:
It will be much easier to control your results if you light-paint in total darkness.
2. Arrange table top scene:
Set up an interesting table top arrangement. Don’t be afraid to overlap and crowd things up a bit.
3. Place camera on tripod:
Place your camera on a tripod. Try a few angles from above and eye-level.
4. Set Manual Mode:
Start with something like ISO 200 – f/11 – 30 seconds. If the light is too bright, make some adjustments. See # 8, below.
5. Lock the focus:
With the lights on, focus on the focal point, then switch the Auto Focus to Manual, so the camera won’t try to refocus during the light painting.
6. Activate Self-timer:
Turn self-timer to a 5 second delay (to give you time to get in place), turn off all lights, then press the shutter.
7. Paint light from off-camera:
Light the scene with a small LED flashlight from the sides of the scene for “off-camera lighting.” In other words, avoid lighting the scene from the same angle as your camera. Use your flashlight like a paintbrush, with circular, feathered motions from about 5 – 15 inches away. Move around the scene, spending a few seconds on each area. To avoid light trails (random lines of light from the flashlight), do not point your light directly at the camera. Also, you can use black “gaffers tape” (or duct tape) on the end of your flashlight to reduce and shape the light source. This will also help you reduce the light trails.
8. Adjust the lighting:
Check your results, then adjust the ISO, shutter speed and f-stop for more or less light. For example, if things are too bright: Change the ISO to 100; Change the aperture to f/16; and/or Reduce the shutter speed to 15 seconds.
9. Leave dark areas:
For a more artistic result, be sure to leave some areas dark. Since this is a light painting you should leave part of the scene dark. The light is much more creative if it is subtle in some places. Light up the focal points and the interesting colors and textures.
10. PRACTICE!
Repeat many times for optimal results. It will take many hours and many setups to get great results. This is one of my favorite styles of photography. It is a passion of mine for the past year, so I take it very seriously and practice whenever I can spend a few hours in the dark, without being rushed. It is not easy, but very satisfying for me. I hope you enjoy it.
OTHER STYLES OF LIGHT PAINTING
If you want to try something much easier to master, use a smaller light source (pen light, laser pointer, colored glow stick, cell phone) to paint in mid-air or trace an object with light. This style of light painting is completely different, but equally fun… and much quicker to learn and produce satisfactory results.
MY GEAR LIST FOR THIS SHOOT:
Camera: Nikon D7000
Sharp Lens: Nikon 85mm f/1.4 AF-S G
Pistol Grip Head on Tripod: The Sunpack Pistol Grip (Click Here) (Sunpak 620-PISTOLGRPQR – larger style on Amazon is $30 – 40) – I LOVE how I can quickly lock in any angle with this tight Pistol Grip Ball Head. You can remove the head on most tripods, so I just replaced my old Bogen/Manfrotto head with this new “squeeze, position, and lock” pistol grip, and I save a lot of time getting the precise angle I need. It just takes too long to keep re-twisting the turn-handle on a ball-head, and I don’t like the three-way pan head either. The squeeze-and-release locking method with the Pistol grip is the way to go!
LED Light: Mag-Lite XL100 (Click Here) (Amazon Price: $25)

Any inexpensive dollar-store LED light will do, but my favorite flashlight for table top light painting is the Maglite XL100, because I can adjust the amount of light by rotating the flashlight. Every LED light has a different light "color" so you may have to adjust your White balance to accommodate. It will take a few shots at different WB to find the right "color of light." With the nice white-cream colored light I get from this XL100, I usually shoot with Auto WB and get great results. I used photographer's "gaffer tape" to create a "Snoot" on my light for this shoot so I could pinch down the tape and reduce the amount of light. Even though I turned my light down to 10% of the full beam, I was still getting a little too much light at times... especially when shooting at larger apertures (1.4) with my Nikon 85mm f/1.4 AF-S G lens.

Edited image: I masked in the old flashlight from another image, that appeared to be turned on. I shined my LED light in the end of the old light to make it light up. I often use this technique when I light paint old trucks outside. I shine my light in the old headlights, and it looks like they are shining in the darkness.
NO EDITING NEEDED
Most of these light paintings are COMPLETELY UNEDITED because it is easier to control the light, focus and composition when you light paint and use Manual mode with a tripod. It is a deliberate, planned photoshoot that produces fabulous results most of the time…Once you get the hang of it. 🙂
INSPIRATION FOR THIS OLD 1940s OFFICE SCENE
My inspiration for this shoot is a combination of my interest in Sherlock Holmes mysteries and a collection of old desk pieces of my fathers, who was a CPA, and had all kinds of interesting gadgets on his desk. I used to love going to his office to check out his stuff. When my mother died a few months ago, my father moved from Idaho to Arizona, so he gave away a lot of old things. The old books and the brass counter are his. The black gloves are my mother’s. I acquired the typewriter for $10 at an awesome estate sale last summer along Highway 20 near Ashton. I found the old flashlight, telephone and binoculars at various antique stores over the years. I do love finding deals on old things, as much as I like discovering old buildings and ghost towns. I bought the old hat at a neighbor’s garage sale, when her husband passed away. These items were popular in the 1940s, so they remind me of something that would be on the desk of a private investigator in that era.


I love the simplicity of this tutorial. It makes something that seems so difficult, something that anyone can try. When I say “anyone” I mean just that. My 13 and 7 yr old are creating their own Light Paintings from your tutorial. It’s awesome how they can be creative and explore the world of photography at such a young age. Thanks!
Love this set up Caryn and the theme of the props. Just the word tabletop alone makes me feel like I can give this a try!
You definitely have the “HEART OF A TEACHER”. These are great tuitorials and I’m sure your STUDENTS ADORE Y.O.U. ! ! ! Hope to meet you someday . . . soon!
Thanks, Roberta! You just made my day. I do love teaching. 🙂 I too, look forward to meeting you. I am at a cabin writing my new book. I try to work on it at least two days a week. Anyway, on the way to Island Park last night, there was the most amazing sunset. I though of you and your beautiful landscapes of our area. Anyway, I did some Panoramics of Swan Lake. The reflections and magnificent clouds all lit up in orange made it one of those “once-in-a-lifetime'” moments… That lasted for about 30 minutes! So exhilarating.
This tutorial is great. I really like how simple it is, yet how creative we can be with it! That’s what I like about light painting, you can take multiple pictures of something and make it look different each time, without even moving your camera!
Thanks, Danny! You are awesome at light painting, so this is a compliment, coming from you 🙂
Beautiful! And thanks for the info!
I’m going to buy a Canon G1X. This camera does not have a bulb, but it does have 60 seconds exposure. Is this long enough for most outdoor and indoor light painting? (no sky shots.)
Charles (Holland)
I love this page of tabletop photography. What are the settings used on your Camera to create this look. I have a Nikon D90.
Thanks Esther
Hi Esther, it is great to hear from you. I list my technique and camera settings in this post. I hope it helps, so you can try it out. Thanks again for the comment.
I have come across your web site and have book marked it as top of my list. I have been doing photography since 120/220 roll film days of medium format and now use canon digital. Have become bored with photography as most photography web sites looks much the same, with the exception of your work. I have been resurrected into a new realm of visual expression. It is so easy to put a tripod in the same exact same spot as those photographers featured in “Outdoor Photography” magazine and try to get the exact same image. Light painting is very unique maybe like the human finger print.
Hello Rob,
Thank you so much for your kind comment. I am glad you like my light paintings. I have such a passion for night photography and I too find it is exhilarating to try new things with photography. I also love macro photography because there are so many fascinating things to see in miniature. It is a whole new world when you see things up close and personal.